

Introduction
Being an MEV searcher is just like being a philosopher. Your days will consist of 80% thinking, 10% building, and the remaining 10% dreaming. The last two weeks have been just like that for me.
I was one and a half months into studying MEV when I realized that if I continued on this path, I could spend my entire life studying MEV without ever building a real bot. The subject was so vast that the more I delved into it, the deeper I went, only to realize that there was no bottom.
Therefore, I made the decision to pause my studies for a while and start doing what I initially set out to do: build a working MEV bot.
I noticed the resemblance between arbitrage strategies and the classic game of Whack-A-Mole, so I decided to name my bot after the game.
Arbitrage strategies are extremely easy to grasp at the surface level, as it all boils down to buying for cheap and selling for more elsewhere.
These opportunities randomly pop up from all over the markets, and people constantly monitor these events, moving quickly to profit from the spread. Hence, it’s essentially a game of Whack-A-Mole played by multiple participants from all over the world.
However, it’s easy to be misled by the surface level simplicity, as the inner mechanisms are quite sophisticated and require a well-thought-out plan before executing the strategies.
Today, I am going to cover pretty much everything you need to get started with MEV arbitrage. You will learn to plan ahead of action and understand what the top-tier searchers are doing to improve their bots. The project I am using to explain this to you may not be the best out there, but it’s written in Python and is easy to follow along. I valued simplicity and readability over everything else for my MEV bot prototype.
I am open sourcing this project so that people that are working on their personal projects like me can benefit from this. You can go checkout my Github repo link below (it is a link to the “examples” branch of my DEX arbitrage strategy):
You can download the project here.
Why am I open-sourcing this?
This project has all the essential components of MEV bots ranging from:
- Cyclic path finder
- Asynchronous event streams
- Gas estimator
- Online swap simulator
- Smart contract that can trade on multiple DEXs
- Order execution using Flashbots
- Monitoring spread with InfluxDB
- Sending alerts using Telegram
(The last two aren’t actually essential… 😚)
However, the project at its current state is more of a base template for starting MEV searchers, and will need some optimizations here and there to make it become profitable.
Moreover, Whack-A-Mole V1 only supports DEX arbitrage on a single chain for the time being, which among three types of different arbitrages:
- Single chain, multiple DEXs arbitrage
- Multiple chains, multiple DEXs arbitrage
- CEX-DEX arbitrage
is the easiest to pull off and, thus, is the least profitable.
At the end of this post, I’ll talk about how this bot can be optimized, and how this system can expand to multi-chain arbitrages, and CEX-DEX arbitrages.
NOTE: This bot is actually under-optimized to work like the average MEV bot that people are most likely to start with.
- At the contract level, it intentionally uses Solidity and no assembly (Yul) to demonstrate how gas price optimizations can enhance bot profitability in later blog posts
- At the gas price level, it simply uses Blocknative’s gas estimator service to set gas prices. We could actually further analyze our competitors within this space and try to understand their gas pricing strategies
- At the simulation level, it uses online simulation via smart contracts which adds to the latency caused by using a higher level language such as Python. The simulation engine will need to be taken offline for a speed-up, also using a lower level language.
- At the execution level, it only sends its private transactions to Flashbots, one of many block proposers. This isn’t ideal as Flashbots only succeeds to add their bundles/transactions into new blocks approximately 1 out of 5 times nowadays. This is a guaranteed 20% success rate. Not very good.
- At the capital efficiency level, it doesn’t use flashloans yet, so it can’t fully leverage the opportunities in the markets, and as a result lose out to competitors who are earning more profits and bribing more to block builders. (We’ll get more into the dynamics of how our transactions/bundles can get added more efficiently)
When the points above are handled correctly, this bot will easily expand over to strategies like sandwiching and JIT liquidity providing, etc, as all MEV essentially share the same core codebase.
Here are the Table of Contents below:
Table of Contents
- Why MEV arbitrage?
- Do DEX arbitrage opportunities still exist?
- How Whack-A-Mole works
- Future optimizations
1. Why MEV arbitrage?
There are a range of strategies we can select from when extracting MEV. These opportunities exist in the form of 1. arbitrage, 2. frontrunning, 3. backrunning, and/or 4. sandwiching.
Of these well known MEV alphas, I decided to go with arbitrage for the following several reasons:
Decentralized protocols nowadays are becoming more MEV aware and are putting in the effort to give back to their users by reducing MEV opportunities that negatively impact their users. Thus, frontrunning/backrunning/sandwiching will become harder to extract from here on out.
You can go check out UniswapX, as an indicator of this trend.
Moreover, these opportunities are becoming harder to extract as more competitors rush in to fight for the same alpha. Below is what basically happens when a lot of people are looking at the same transactions to extract MEV from.

There are multiple MEV searchers all wanting to use that single transaction because it’ll generate the most profit for them. However, Jared (MEV searcher #1) wants to use that transaction for his sandwich bundle, and MEV searcher #2 wants to use it for his Uniswap V3 JIT(Just-In-Time) bot. And there’re a couple more searchers trying to use it in other form of MEV strategies.
When this happens, whoever pays the most gas, and earns the most profit with whichever strategy will get to use that transaction to build one’s bundle.
All in all, not everyone can use the same transaction. Transactions are scarce, and worse yet, these opportunities are slowly disappearing as protocols become MEV aware.
However, there is a sort of MEV that can make the community a healthier place, and at the same time grow in size as more crypto exchanges are introduced. Arbitrages will generally benefit both end users and MEV searchers.
According to Eigenphi, arbitrage seems to have the biggest market share in MEV space as well. (https://eigenphi.io/)
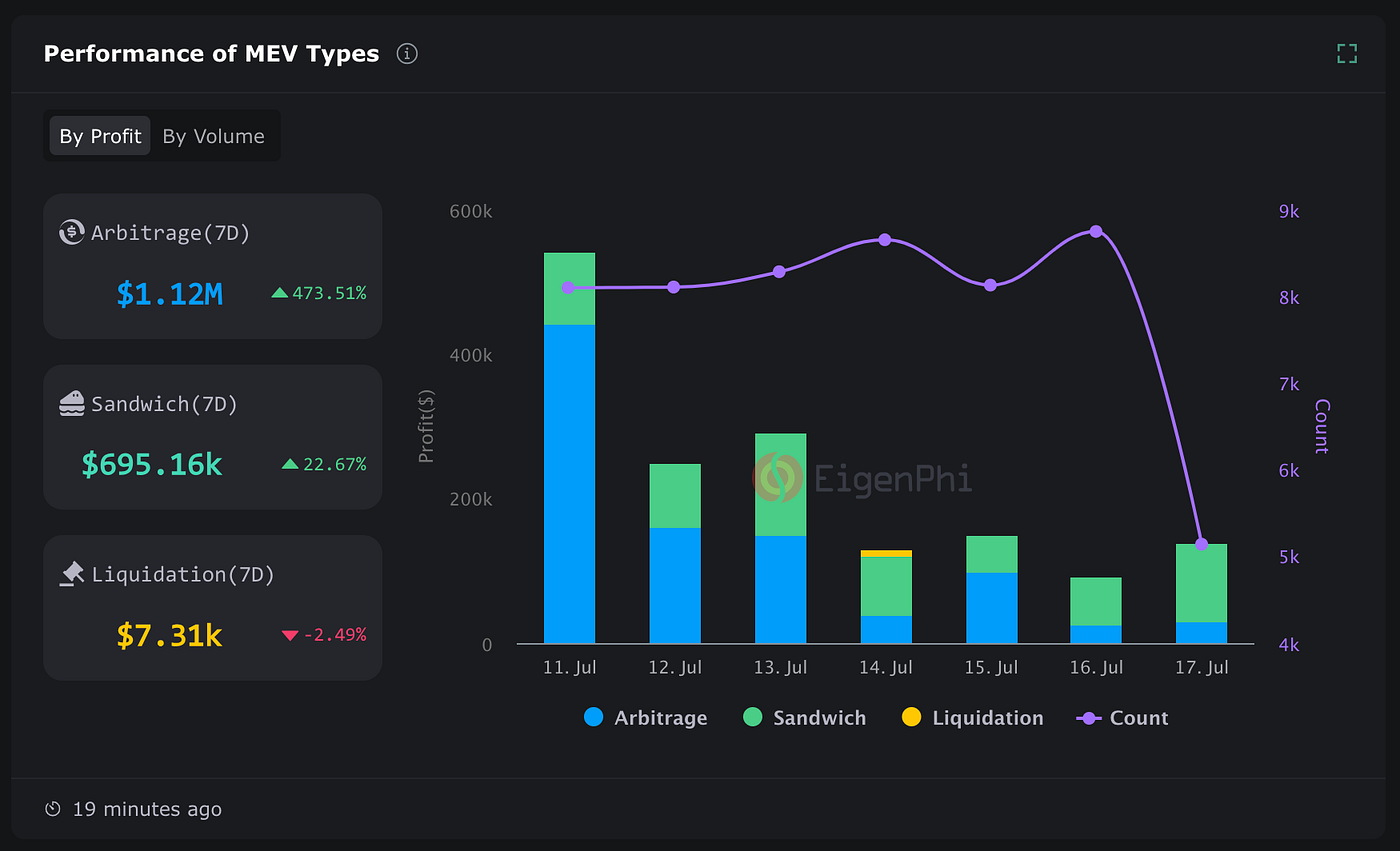
This is expected, because whereas MEV such as sandwiching will die out with enhancements to UI/UX taking care of these negative externalities, more and more new exchanges both on-chain and off-chain will emerge and cause price drifts.
Price differences occur as a result of liquidity differences, and unless all exchanges share the same amount of liquidity and the same number of users, the price among these exchanges will never really sync with each other. And that’s what we want as arbitrageurs.
2. Do arbitrage opportunities still exist?
Let me introduce Whacker. He is a searcher, and he will talk about arbitrage strategies. Below is what arbitrage looks like IMO. It’s a game of Whack-A-Mole.

So, do arbitrage opportunities still exist?
This is a big question. And the very first question that anyone interested in this field should ask before they can start to dig in. We should always understand the market size before we do any serious business.
And, arbitrage opportunities still exist, of course, because crypto markets are full of inefficiencies, and just by looking at Eigenphi’s dashboard we can figure out that: Over the course of 7-days, close to 1.2M dollars worth of MEV was extracted via arbitrage — on Ethereum alone.
The good news is, these opportunities are everywhere: DEX to DEX, CEX to DEX, CEX to CEX. This becomes endless.
I also recommend that you read the above research by Frontier Research. It’ll shed some light on how much potential CEX-DEX arbitrage has compared to DEX only arbitrages, and why this may be so.
The brief reason why CEX-DEX arbitrage yields more fruit is that it involves a riskier practice. Performing DEX arbitrage alone isn’t as risky because your arbitrage can occur atomically — meaning it either happens or doesn’t happen within a single transaction, so the most you’ll lose is your gas fees and maybe your temper.
On the other hand, with CEX-DEX arbitrages, we suddenly have to worry about getting our trades executed in the right order, and at the right price and amount. For example, if a trade went through on Uniswap, but within that timeframe, the sell price (bid) at Binance changed, we might get legged out and be left with Uniswap’s inventory alone. To handle this, we’ll have to search for the second-best bid price at another exchange and send a selling market order there, or maybe just dump our Uniswap inventory right away if it were cheaper that way.
I’ll delve more into the hardships of performing CEX-DEX arbitrages in a later post, so for the time being, let’s get back to where we left off.
So the question we should be asking shouldn’t be whether arbitrage opportunities still exist — because they do — but whether we as starting MEV searchers can extract the same alpha competing against the pro traders already in the game.
To answer this question, we will have to build a simple but working bot together and start competing with the players. There is no other way to prove this than to really try it out for oneself.
Where should we look?
Let’s first go over where we should look when trying to run arbitrage strategies:
- Single chain, multiple DEXs, n-hop swaps
- Multiple DEXs on multiple chains
- Multiple CEXs
- Multiple chains & multiple CEXs
I’m going to go over all of them one at a time eventually, but for today, I intend to work with the first option of using a single-chain environment to trade on multiple DEXs.
Single chain, multiple DEXs, n-hop swaps
This will be the case where:
- We trade on a single blockchain network: Ethereum
- We trade on multiple DEXs: Uniswap V2, Uniswap V3, Sushiswap V3, etc.
- We perform n-hop swaps: single swap, 2-hop swap, 3-hop swap, etc.
Let me show you something very interesting. This just happened as I was writing this post.
Below is the Ethereum ETH/USDT data I’m collecting from Uniswap V3 and Sushiswap V3. I’ve created multiple 2-hop swap paths that starts with USDT (token in), and outputs ETH (token out) as a result. So paths like:
USDT -> ETH,
USDT -> BTC -> ETH,
USDT -> USDC -> ETH
all work.
And over the last 3 hours, the ETH/USDT price between Uniswap and Sushiswap showed a difference of 0.22% and 0.60% after fees were deducted. (Not gas costs or slippage costs, just the fees! This is important)
The spread calculation is done using the formula below:
Spread (%) = (Price 1 * (1 — fee) / Price 2) — 1 * 100
And if you look at below, it is a time-series chart of how much Price 1 is overpriced compared to Price 2. I’ve marked two occasions where Price 1 was over 0.2% compared to Price 2 with red markers.

Now, look at what happened few seconds after:

The spread is gone… 😯
You’ve just seen other arbitrageurs at action.
But why didn’t the 0.22% spread disappear as fast as the 0.60% spread? You have to note that the spread formula above doesn’t account for gas costs or slippage costs yet, so a 0.22% spread doesn’t cover gas costs of performing an arbitrage, but a 0.60% spread does, so the latter opportunity was much more competitive.
So we’ve seen in live action that arbitrage opportunities exist in a single chain, multiple DEX environment. We’ve also seen that there are other competitors looking to do the same thing that we are.
These opportunities tend to crop up in volatile market conditions. I’ve gone over to Binance to see what happened to ETH/USDT price the past three hours.
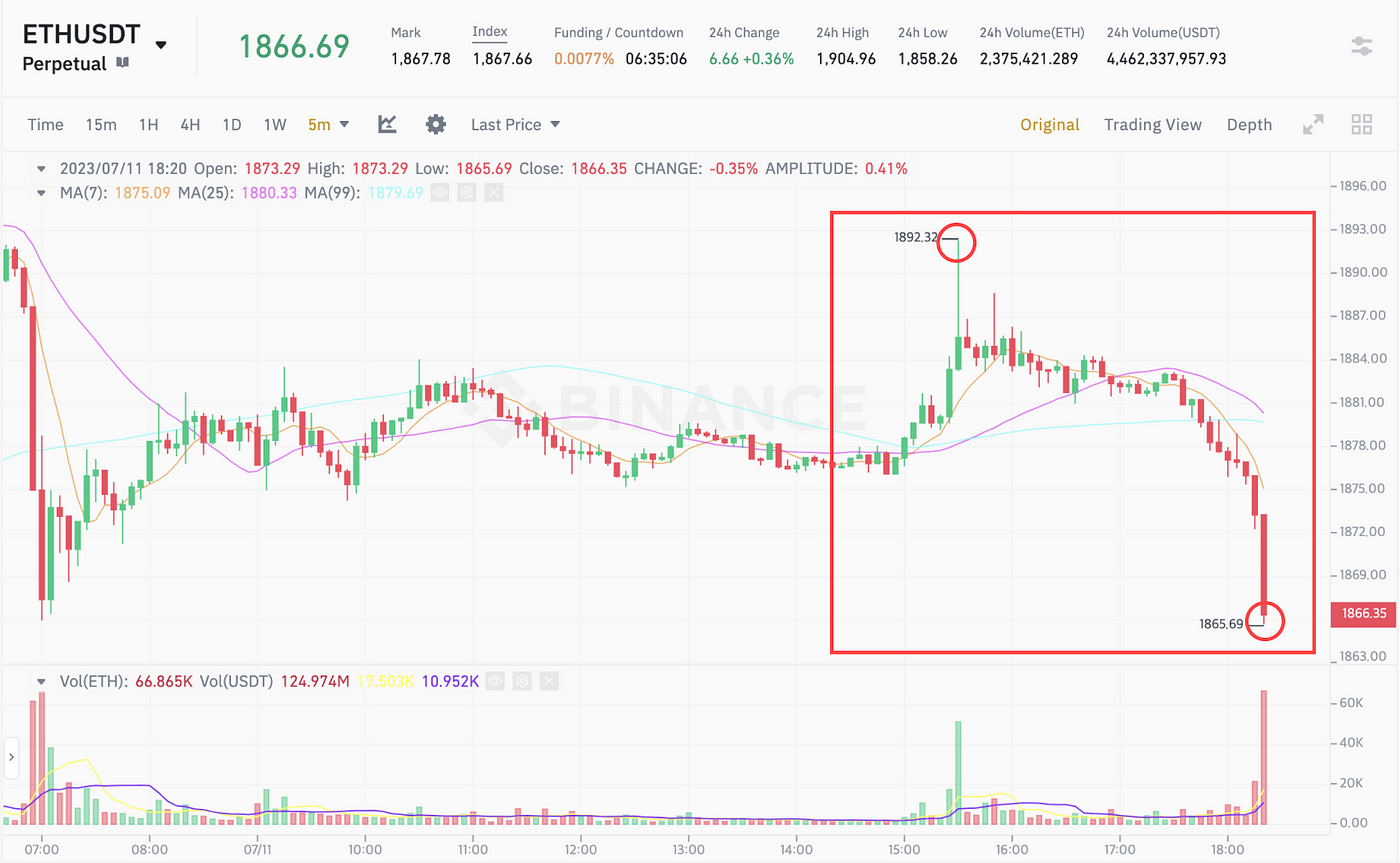
You can view the price movement in the red rectangle, and you’ll understand right away why those arbitrage opportunities cropped up.
Look at another image:

This is the spread I’ve been monitoring for the past 12 hours. Over that time period there were price spikes over 0.4% and multiple occasions of ≥0.2% price spikes.
🛑 Note that the price spread calculation does not account for gas costs. Every searcher operates on a different set of smart contracts with differing gas costs, so the edge each searcher sees will be different from one another. This is very important, so I keep repeating my words over and over.
We’ll look at whether opportunities still exist after we account for gas costs in the next section. The quick answer is that it doesn’t because there are both gas costs and slippage costs to take into account. And slippage costs are surprisingly huge, as you’ll find out soon. But there are still ways to go around that constraint.
3. How Whack-A-Mole works
Seeing Whack-A-Mole in action will be the surest way of understanding what it can and is attempting to do.
There are so many moving parts to an MEV bot that the proper organization of code is of the utmost importance. By tackling the below task together, I hope to show you how MEV bots can be structured. This will basically apply to all MEV, so it’ll serve as a guide to whoever is stumbling through the MEV landscape right now.
📈 The Task
We’ll attempt to generate n-hop swap paths for ETH/USDT, where you want to buy ETH using USDT. We’ll compare the prices of multiple ETH/USDT paths (Paths for buying ETH using USDT) with a target spread, for example, something like +0.4%.
When a price spread is above our targeted spread, we’ll then use the OnlineSimulator to check whether a simulated swap will genuinely generate profits, accounting for both gas costs and slippage costs.
Additionally, we’ll calculate how much capital is needed to achieve the target profit amount. Once we find a profitable arbitrage cycle, we’ll send a bundle with a single private transaction through Flashbots.
Lastly, we’ll strive to understand how our system can be improved to become profitable. This will necessitate a firm understanding of how Flashbots auction systems work and calculating how much we should optimize our smart contracts to compete against other players.
Let’s begin right away 😎
✅ Project Setup
Let’s clone Whack-A-Mole from Github:
git clone https://github.com/solidquant/whack-a-mole.git
git checkout examples/strategy/dex_arb_base
Make sure to switch the branch to examples/strategy/dex_arb_base.
I’m using Python 3.10 for this project, but it should work for all 3.x versions. Next, you should create a virtualenv for the project before you can install the dependencies. Assuming you have, run:
pip install -r requirements.txt
There may be a conflict between web3 and websockets, anyone experiencing an error can simply remove “websockets” from the requirements.txt file and install the “websockets” library manually and use the latest version which is: 11.0.3, and the strategy should run just fine.
To inspect the project, head over to main.py:
import asyncio

from strategies.dex_arb_base import main


if __name__ == '__main__':
    asyncio.run(main())
There’s not much going on here, because I want to add more templates for other strategies in the future, so bulk of the logic will be within our strategies folder.
✅ Block #1: Data
I won’t go too much into the details, but the system will map tokens and pools used in the strategy into integers. So the below information from addresses/ethereum.py:
EXCHANGE = 'ethereum'

TOKENS = {
    'ETH': ['0xC02aaA39b223FE8D0A0e5C4F27eAD9083C756Cc2', 18],
    'USDT': ['0xdAC17F958D2ee523a2206206994597C13D831ec7', 6],
    'USDC': ['0xA0b86991c6218b36c1d19D4a2e9Eb0cE3606eB48', 6],
    'BTC': ['0x2260FAC5E5542a773Aa44fBCfeDf7C193bc2C599', 8],
    'DAI': ['0x6B175474E89094C44Da98b954EedeAC495271d0F', 18],
    'PEPE': ['0x6982508145454Ce325dDbE47a25d4ec3d2311933', 18],
}

columns = ['chain', 'exchange', 'version', 'name', 'address', 'fee', 'token0', 'token1']

POOLS = [
    ['uniswap', 3, 'ETH/USDT', '0x11b815efB8f581194ae79006d24E0d814B7697F6', 500, 'ETH', 'USDT'],
    ['uniswap', 3, 'USDC/USDT', '0x3416cF6C708Da44DB2624D63ea0AAef7113527C6', 100, 'USDC', 'USDT'],
    ['uniswap', 3, 'BTC/ETH', '0x4585FE77225b41b697C938B018E2Ac67Ac5a20c0', 500, 'BTC', 'ETH'],
    ['uniswap', 3, 'DAI/USDC', '0x5777d92f208679DB4b9778590Fa3CAB3aC9e2168', 100, 'DAI', 'USDC'],
    ['uniswap', 3, 'PEPE/ETH', '0x11950d141EcB863F01007AdD7D1A342041227b58', 3000, 'PEPE', 'ETH'],

    ['uniswap', 2, 'ETH/USDT', '0x0d4a11d5EEaaC28EC3F61d100daF4d40471f1852', 3000, 'ETH', 'USDT'],
    ['uniswap', 2, 'USDC/ETH', '0xB4e16d0168e52d35CaCD2c6185b44281Ec28C9Dc', 3000, 'USDC', 'ETH'],
    ['uniswap', 2, 'DAI/USDC', '0xAE461cA67B15dc8dc81CE7615e0320dA1A9aB8D5', 3000, 'DAI', 'USDC'],
    ['uniswap', 2, 'PEPE/ETH', '0xA43fe16908251ee70EF74718545e4FE6C5cCEc9f', 3000, 'PEPE', 'ETH'],

    ['sushiswap', 3, 'ETH/USDT', '0x72c2178E082feDB13246877B5aA42ebcE1b72218', 500, 'ETH', 'USDT'],
    ['sushiswap', 3, 'USDC/ETH', '0x35644Fb61aFBc458bf92B15AdD6ABc1996Be5014', 500, 'USDC', 'ETH'],
    ['sushiswap', 3, 'BTC/ETH', '0x801CCFae9d2C77893B545E8D0E4637C055CD26cB', 500, 'BTC', 'ETH'],
    ['sushiswap', 3, 'USDC/USDT', '0xfA6e8E97ecECDC36302eCA534f63439b1E79487B', 100, 'USDC', 'USDT'],
    ['sushiswap', 3, 'DAI/USDC', '0x31ac258B911Af9a0d2669ebDFC4e39D92e96b772', 100, 'DAI', 'USDC'],

    ['sushiswap', 2, 'BTC/ETH', '0xCEfF51756c56CeFFCA006cD410B03FFC46dd3a58', 3000, 'BTC', 'ETH'],
    ['sushiswap', 2, 'ETH/USDT', '0x06da0fd433C1A5d7a4faa01111c044910A184553', 3000, 'ETH', 'USDT'],
    ['sushiswap', 2, 'USDC/ETH', '0x397FF1542f962076d0BFE58eA045FfA2d347ACa0', 3000, 'USDC', 'ETH'],
    ['sushiswap', 2, 'DAI/ETH', '0xC3D03e4F041Fd4cD388c549Ee2A29a9E5075882f', 3000, 'DAI', 'ETH'],
]

POOLS = [dict(zip(columns, [EXCHANGE] + pool)) for pool in POOLS]
will map into:
from data.dex import DEX

from configs import RPC_ENDPOINTS, TOKENS, POOLS


dex = DEX(rpc_endpoints=RPC_ENDPOINTS,
          tokens=TOKENS,
          pools=POOLS,
          trading_symbols=['ETH/USDT'],
          max_swap_number=2)

print('Chain ID: ', dex.chain_to_id)
print('Exchange ID: ', dex.exchange_to_id)
print('Token ID: ', dex.token_to_id)

"""
Output:

Chain ID:  {'ethereum': 0}
Exchange ID:  {'sushiswap': 0, 'uniswap': 1}
Token ID:  {'BTC': 0, 'DAI': 1, 'ETH': 2, 'PEPE': 3, 'USDC': 4, 'USDT': 5}
"""
All the code from these examples can be viewed from here.
Using the ID mappers created in DEX class instance, it will next create a 6-dimensional Numpy array that is defined as below (in data/dex.py):
"""
storage_array
: 6-dimensional array that stores storage values from pool contracts
"""
self.storage_array = np.zeros((
    len(self.chains_list),      # chains
    len(self.exchanges_list),   # exchanges
    len(tokens_list),           # token in
    len(tokens_list),           # token out
    2,                          # uniswap variant version: 2, 3
    8                           # decimals0, decimals1, reserve0, reserve1, sqrtPriceX96,
                                # fee, token0_is_input, pool_index
))
This array will store storage values from the blockchain into 8 fields that are: 1. decimals0, 2. decimals1, 3. reserve0, 4. reserve1, 5. sqrtPriceX96, 6. fee, 7. token0_is_input, 8. pool_index.
This is very convenient, because, if for example, we want to get the storage values of Uniswap V3 ETH-USDT pool on Ethereum, we can simply retrieve that data using the data structure like below:
idx_1 = dex.get_index(chain='ethereum',
                      exchange='uniswap',
                      token0='ETH',
                      token1='USDT',
                      version=3)

idx_2 = dex.get_index(chain='ethereum',
                      exchange='uniswap',
                      token0='USDT',
                      token1='ETH',
                      version=3)

idx_1_values = dex.storage_array[idx_1]
idx_2_values = dex.storage_array[idx_2]

print(idx_1, idx_1_values)
print(idx_2, idx_2_values)

"""
Output:

(0, 1, 2, 5, 1) [1.80000000e+01 6.00000000e+00 0.00000000e+00 0.00000000e+00
 3.46077663e+24 5.00000000e-04 1.00000000e+00 0.00000000e+00]

(0, 1, 5, 2, 1) [1.80000000e+01 6.00000000e+00 0.00000000e+00 0.00000000e+00
 3.46077663e+24 5.00000000e-04 0.00000000e+00 0.00000000e+00]
"""
Using either ETH or USDT should return the same pool data, and it does, by saving the same data on both space in storage_array. Also, I used one fee level per pool for simplicity. I simply did this by picking the pool with the most liquidity/traded volume.
We would like to update the storage data based on real-time events, so we use the DexStream class to achieve this.
Going over to data/dex_streams.py, we can see the function called start_streams:
def start_streams(self):
    streams = []

    for chain in self.dex.chains_list:
        block_stream = reconnecting_websocket_loop(
            partial(self.stream_new_blocks, chain),
            tag=f'{chain.upper()}_Blocks'
        )
        streams.append(block_stream)

    for chain in self.dex.chains_list:
        v2_stream = reconnecting_websocket_loop(
            partial(self.stream_uniswap_v2_events, chain),
            tag=f'{chain.upper()}_V2'
        )
        v3_stream = reconnecting_websocket_loop(
            partial(self.stream_uniswap_v3_events, chain),
            tag=f'{chain.upper()}_V3'
        )
        streams.extend([asyncio.ensure_future(f) for f in [v2_stream, v3_stream]])

    loop = asyncio.get_event_loop()
    loop.run_until_complete(asyncio.wait(streams))
Whack-A-Mole is made to support multi-chains, so we loop through all the chains and start an asynchronous websocket stream to retrieve data for
- new headers,
- 2. Uniswap V2 Sync events,
- 3. Uniswap V3 Swap events.
Running this is very simple:
import asyncio
import aioprocessing
from multiprocessing import Process

from data.dex import DEX
from data.dex_streams import DexStream

from configs import (
    RPC_ENDPOINTS,
    WS_ENDPOINTS,
    TOKENS,
    POOLS,
)

# Settings
chain = 'ethereum'
rpc_endpoints = {chain: RPC_ENDPOINTS[chain]}
ws_endpoints = {chain: WS_ENDPOINTS[chain]}
tokens = {chain: TOKENS[chain]}
pools = [pool for pool in POOLS if pool['chain'] == chain]
trading_symbols = ['ETH/USDT']


def dex_stream_process(publisher: aioprocessing.AioQueue):
    dex = DEX(rpc_endpoints=rpc_endpoints,
              tokens=tokens,
              pools=pools,
              trading_symbols=trading_symbols,
              max_swap_number=2)

    dex_stream = DexStream(dex=dex,
                           ws_endpoints=ws_endpoints,
                           publisher=publisher)
    dex_stream.start_streams()


async def strategy(subscriber: aioprocessing.AioQueue):
    while True:
        data = await subscriber.coro_get()
        print(data)


if __name__ == '__main__':
    # Starting DexStream
    queue = aioprocessing.AioQueue()

    # Start a process of DEX streams
    p = Process(target=dex_stream_process, args=(queue,))
    p.start()

    asyncio.run(strategy(queue))
Running this will look like:

🛑 Note: To run this, you’ll need to have Blocknative’s API token! This is essential for gas estimation. Blocknative has a dashboard like below, and the data here can be accesses via API calls:

✅ Block #2: Path finder
To understand the real-time data retrieved through DEX streams, that look like this:
{
  'source': 'dex',
  'type': 'event',
  'block': 17726053,
  'path': [[[0, 1, 5, 2, 1], [0, 0, 0, 0, 0]], [[0, 1, 5, 2, 0], [0, 0, 0, 0, 0]], [[0, 0, 5, 2, 1], [0, 0, 0, 0, 0]], [[0, 0, 5, 2, 0], [0, 0, 0, 0, 0]], [[0, 1, 5, 4, 1], [0, 1, 4, 2, 0]], [[0, 1, 5, 4, 1], [0, 0, 4, 2, 1]], [[0, 1, 5, 4, 1], [0, 0, 4, 2, 0]], [[0, 0, 5, 4, 1], [0, 1, 4, 2, 0]], [[0, 0, 5, 4, 1], [0, 0, 4, 2, 1]], [[0, 0, 5, 4, 1], [0, 0, 4, 2, 0]]],
  'pool_indexes': [[0], [5], [9], [15], [1, 6], [1, 10], [1, 16], [12, 6], [12, 10], [12, 16]],
  'symbol': 'ETH/USDT',
  'tag': ['ethereum-0', 'ethereum-1', 'ethereum-2', 'ethereum-3', 'ethereum-4', 'ethereum-5', 'ethereum-6', 'ethereum-7', 'ethereum-8', 'ethereum-9'],
  'price': [1908.0519148221722, 1910.8749837806993, 1911.117066215452, 1911.0445021506505, 1908.5838300538105, 1910.425470198242, 1911.5290103508617, 1908.4971959551506, 1910.3387525041794, 1911.4422425651003],
  'fee': [0.0004999999999999449, 0.0030000000000000027, 0.0004999999999999449, 0.0030000000000000027, 0.0030997000000000385, 0.0005999499999999047, 0.0030997000000000385, 0.0030997000000000385, 0.0005999499999999047, 0.0030997000000000385]
}
I have to show you what the path finder in DEX class does. This can be done in many ways, so there is no right or wrong way of doing it, but I’ll show you how I managed to generate paths.
If you take a closer look at the first path in “path”:
[[0, 1, 5, 2, 1], [0, 0, 0, 0, 0]]
you’ll see that it’s a List of two List elements: List[List[int]]. This is because, I indicated that I want to generate maximum of 2-hop paths.
Let’s take a look at the first element: [0, 1, 5, 2, 1]. The second element is all 0’s. This is a 1-hop path that takes Token #5 as token_in, and Token #2 as token_out. That’s USDT and ETH.
As you can tell, this is the index of DEX.storage_array that we’ve seen earlier. Now look at data fields in “pool_indexes”, “tag”, “price”, “fee”.
The first element of “pool_indexes” is [0]. This means that the first path uses pool data from the 0th index, which is:
['uniswap', 3, 'ETH/USDT', '0x11b815efB8f581194ae79006d24E0d814B7697F6', 500, 'ETH', 'USDT']
Tag, price, fee are the same. The first element of each field will point to the matching path. So for the first path we are looking at, it’s:
- Price quote is: 1908.0519148221722 USDT per ETH
- Tag is: “ethereum-0”, meaning 0th path in Ethereum (this is unnecessary to the core logic, but added for debugging purposes)
- Fee is: 0.0004999999999999449 (that’s 0.05%, but broken because it’s represented as a floating point number)
🔵 How to find cyclic paths for arbitrage:
Using the paths from above, we can now generate cyclic paths to use in our arbitrage strategy.
Let’s take two random paths from above:
- Path #1: [[0, 1, 5, 2, 1], [0, 0, 0, 0, 0]]
- Path #2: [[0, 1, 5, 4, 1], [0, 1, 4, 2, 0]]
Remember the indexes here represent:
(chain, exchange, token_in, token_out, version)
We’ll simply look at token_in, token_out. After we created our DEX class instance, we tried printing out dex.chain_to_id, dex.exchange_to_id, dex.token_to_id dictionaries that looked like:
Chain ID:  {'ethereum': 0}
Exchange ID:  {'sushiswap': 0, 'uniswap': 1}
Token ID:  {'BTC': 0, 'DAI': 1, 'ETH': 2, 'PEPE': 3, 'USDC': 4, 'USDT': 5}
So the first path is a 1-hop path of:
- Uniswap V3 USDT → ETH on Ethereum
And the second path is a 2-hop path of:
- (Uniswap V3 USDT → USDC) → (Uniswap V2 USDC → ETH) on Ethereum
Comparing the price between these two paths is equivalent to looking at a triangular arbitrage path.
- BUY: Uniswap V3 USDT → ETH
- SELL: (Uniswap V2 ETH → USDC) → (Uniswap V3 USDC → USDT)
✅ Edge calculation & Assessment of our strategy
With data part out of the way, we can finally get into the more interesting aspect of our system. The thinking part… 😚
Like I said earlier, MEV is all about thinking, especially about your edge and others’ competitive edge.
Let’s consider what an edge is in arbitrage strategies, and especially in MEV arbitrage. To do this, we will use some simple math — mostly just basic algebra.
What’s an edge?

An edge is simply the profit minus the cost. Well, everyone knows that, right? So, we’ll take a deeper look at each factor.
Starting with profit:

Sorry about the terrible hand writing…
Profit is defined as above. It’s:
price_sell * amount_in * (1 — slippage_sell)
minus
price_buy * amount_in * (1 — slippage_buy)
This can get simplified to:

It’s the amount of token we input deducting slippage costs and multiplying that by the price spread.
And, cost is defined as below:

Cost is (gas_price * gas_used) + (buying_fee + selling_fee). Where gas price is the value of:
min(max_fee_per_gas, base_fee + max_priority_fee_per_gas)
More information on gas costs can be viewed from here:
If we add the formulas for profit and cost together, we get:

This is very important, as this will the metric we use to make an assessment of our strategy. This basically means that:
To earn a profit in the arbitrage game, our amount_in should be greater than that of cost / profit ratio.
Now, let that sink in a bit.
This simple formula actually tells us a lot about the MEV game. It also points to how we should go about optimizing our system for better performances.
- Gas price, gas usage, and fee levels directly impact our cost, so paying more for gas, fee, or using more gas will lead to more costs on our side.
- Bigger the price spread, the greater our profit will be, also as the denominator in our formula becomes bigger, the capital we need to as amount_in will shrink in size.
- The more starting capital you have, the easier it’ll be to beat the cost / profit ratio.
- However, more amount_in will mean a higher slippage cost, so this game isn’t all about capital either.
Now to give you a few tips on how to optimize these aspects:
- Gas price: analyze your competitors fighting for the same edge, and just pay a little more gas to beat them.
- Gas usage: use assembly/Yul or lower level language like Huff to optimize the heck out of your smart contracts, you’ll be able to lower your gas usage.
- Price spread: monitor more DEXs, CEXs to get better bid/ask prices compared to your competitors.
- Slippage: lower slippage costs by using exchanges/pools with a lot of liquidity. The more TVL/liquidity there are, the smaller your trade is going to impact the market.
✅ Block #3: Simulator
We can test for our edge by running the simulator. For this current version, I borrowed heavily from my previous post.
I’ve tweaked the Solidity code a little bit to fit my needs for Whack-A-Mole. And the Solidity code can be seen from here:
Using this contract is straightforward. First, we make sure to set the value for our env variable, ETHEREUM_SIMULATOR_ADDRESS.
ETHEREUM_SIMULATOR_ADDRESS=<CONTRACT_ADDRESS>
Let me quickly run dex_arb_base.py program to capture whatever edge I can find before I can run any simulations. Running the code I see:
[2023-07-19 21:28:49.645293] Update took: 0.0191 secs. SUS3ETHUSDT/UNI3ETHUSDT: 0.15%
There’s a price spread of 0.15% between Uniswap V3 ETH/USDT and Sushiswap V3 ETH/USDT. I’ll quickly run a simulation to see if we can earn any profits. Let’s look at the necessary information for our simulation:
{
  'key': 'SUS3ETHUSDT/UNI3ETHUSDT',
  'max_buy_sell_price': [1906.0595172354178, 1911.117066215452],
  'block': 17727252,
  'cancel_at': 17727253,
  'buy_path': [[0, 1, 5, 2, 1], [0, 0, 0, 0, 0]],
  'sell_path': [[0, 0, 5, 2, 1], [0, 0, 0, 0, 0]],
  'buy_pools': [0],
  'sell_pools': [9],
  'estimated_gas_used': 200000,
  'order_processing': False
}
We see that the buy_price is 1906, and the sell_price is at 1911, which approximately translates to a 0.15% spread deducting swap fees.
Go to here
There’s an example code of how to use the OnlineSimulator:
if __name__ == '__main__':
    import os
    from dotenv import load_dotenv

    from configs import RPC_ENDPOINTS
    from addresses.ethereum import TOKENS, POOLS, SIMULATION_HANDLERS

    load_dotenv(override=True)

    ETHEREUM_SIMULATOR_ADDRESS = os.getenv('ETHEREUM_SIMULATOR_ADDRESS')

    chain = 'ethereum'

    rpc_endpoints = {chain: RPC_ENDPOINTS[chain]}
    tokens = {chain: TOKENS}
    pools = [pool for pool in POOLS if pool['chain'] == chain]
    contracts = {chain: ETHEREUM_SIMULATOR_ADDRESS}
    handlers = {chain: SIMULATION_HANDLERS}

    sim = OnlineSimulator(rpc_endpoints, tokens, pools, contracts, handlers)

    """
    ETH/USDT
    - Buy: USDT -> ETH
    - Sell: ETH -> USDT

    Buy, sell should work like CEXs
    """
    for i in range(100, 1000, 100):
        amount_in = i * 10 ** 6
        print('==========')
        print('Amount in: ', amount_in)

        buy_path = [[0, 1, 5, 2, 1], [0, 0, 0, 0, 0]]
        sell_path = [[0, 0, 5, 2, 1], [0, 0, 0, 0, 0]]

        buy_pools = [0]
        sell_pools = [9]

        params = sim.make_params(amount_in, buy_path, sell_path, buy_pools, sell_pools)

        for param in params:
            print(param)
        """
        SUS3ETHUSDT/UNI3ETHUSDT

        - Buy: UNI3ETHUSDT
        - Sell: SUS3ETHUSDT

        Output:

        {'protocol': 1, 'handler': '0x61fFE014bA17989E743c5F6cB21bF9697530B21e', 'tokenIn': '0xdAC17F958D2ee523a2206206994597C13D831ec7', 'tokenOut': '0xC02aaA39b223FE8D0A0e5C4F27eAD9083C756Cc2', 'fee': 500, 'amount': 100000000}
        {'protocol': 1, 'handler': '0x64e8802FE490fa7cc61d3463958199161Bb608A7', 'tokenIn': '0xC02aaA39b223FE8D0A0e5C4F27eAD9083C756Cc2', 'tokenOut': '0xdAC17F958D2ee523a2206206994597C13D831ec7', 'fee': 500, 'amount': 0}
        """

        simulated_amount_out = sim.simulate(chain, params)
        print(f'Simulated amount out: {simulated_amount_out / 10 ** 6} USDT')

        simulated_profit_in_usdt = (simulated_amount_out - amount_in) / 10 ** 6
        print(f'Simulated profit: {simulated_profit_in_usdt} USDT')
I run a loop and use 100, 200, 300 all the way up to 900 to see if swapping that amount will leave us with a profit. The output of the above is:
==========
Amount in:  100000000
Simulated amount out: 100.149096 USDT
Simulated profit: 0.149096 USDT
==========
Amount in:  200000000
Simulated amount out: 200.258044 USDT
Simulated profit: 0.258044 USDT
==========
Amount in:  300000000
Simulated amount out: 300.326868 USDT
Simulated profit: 0.326868 USDT
==========
Amount in:  400000000
Simulated amount out: 400.355592 USDT
Simulated profit: 0.355592 USDT
==========
Amount in:  500000000
Simulated amount out: 500.34424 USDT
Simulated profit: 0.34424 USDT
==========
Amount in:  600000000
Simulated amount out: 600.292837 USDT
Simulated profit: 0.292837 USDT
==========
Amount in:  700000000
Simulated amount out: 700.201405 USDT
Simulated profit: 0.201405 USDT
==========
Amount in:  800000000
Simulated amount out: 800.06997 USDT
Simulated profit: 0.06997 USDT
==========
Amount in:  900000000
Simulated amount out: 899.898555 USDT
Simulated profit: -0.101445 USDT
Look at the output carefully. You’ll see that the profit amount increases at first as we input more USDT tokens in. However, after 400 USDT, our profit starts to shrink in size. And finally after we’ve swapped 900 USDT, we see that we make our first loss.
Sadly, the liquidity of these pools aren’t so great, that even a few hundred USDTs can cause significant market impact.
Also, the estimated gas cost of swapping in two consecutive pools cost my contract 200,000 gas. I go over to Blocknative and quickly check how much base_fee and max_priority_fee is. It is close to 20. If I use 40 to overprice my gas costs:
40 gwei * 200,000 gas = 0.008 ether (=close to $15)
This is no where close to the maximum profit you can gain from performing an arbitrage between the two pools, which was a profit of 0.35 USDT at maximum.
Using the equation from the previous section, we can calculate the minimum amount of amount_in needed to be profitable given gas price, gas used, price spread. To get an estimate, I’ll simply use:
min_amount_in > (gas_price * gas_used) / price_spread
Cost: 40 gwei * 200,000 gas * 1911.117 = 15.288936 in USDT
Profit: 1911.117 – 1906.06 = 5.06 USDT per 1 ETH as input
So the amount of ETH we need to input to breakeven with this setup is: 3.02 ETH (=5756 USDT).
If we try to simulate the results of swapping 5756 USDT, the output is:
Simulated amount out: 5687.705938 USDT
Simulated profit: -68.294062 USDT
A rough calculation shows us that the slippage is close to 1%.
🛑 Using an online simulator is actually very inefficient due to network costs. A single call through a node service like Infura, Alchemy will take close to 0.3~1.0 second, whereas using a private node at your local machine will be close to 10~100 times faster.
However, even this method isn’t the best way to do it. Simulations should be done offline, then all the calculations will be done within 0.0001 second if you use Numpy — maybe even more with C, C++, or Rust.
I’m currently adding Uniswap V2/V3 offline simulator to my codebase, and will share the results with you once I’m done.
✅ Block #4: Execution
With this comes the last building block of Whack-A-Mole, the execution component.
To understand how order execution in the blockchain world works, you’ll need to have a firm understanding of Flashbots. I’m sharing another sloppy drawing of how Flashbots works down below:

There are currently two ways of submitting your transactions on the blockchain: either through the public mempool or through a private relay operated by block builders like Flashbots, Blocknative, Beaverbuild, Rsync-builder, so on and so forth.
Builder status can be seen from the link here
Builders select transactions and bundles sent through their private relays, and try to make their bundles as profitable as possible. This is done by scanning through all the transactions/bundles that come their way and picking the ones that have the highest bribes after running a simulation on their machines.
Exactly how these transactions or bundles are selected can be seen from Flashbots’ release logs.
They share a simple formula for how they sort their transactions:

The formula looks pretty intimidating at first, but the core concept is rather simple.

Just focus on the delta coinbase part and the denominator of sum of gT (gas used by transactions). This basically means that the bigger the coinbase(bribe) amount, the more likely it is for that transaction to get selected. Also, the smaller total sum of gas used means that builders like transactions that don’t use too much gas. This is because Ethereum has a gas limit on how much transactions within a block can use in sum total
If more gas is used within a block, the next block’s base gas fee will increase, and the other way around.
On top of this, we should also note that even if we paid a huge amount of priority fees to builders, we could end up not being added to a new block. This is because just as one searcher can win a transaction, one builder can win with each block. This can easily be seen on Etherscan:

I’ve captured the past couple of blocks added to Ethereum, and as you can see there’re numerous builders fighting for block addition. And of the last 14 blocks submitted, Flashbots won only three times, and never consecutively at that either. This is close to a 20% success ratio, a close figure to that of the below table:

To make sure you get your bundles added to the blockchain, you need to take care of two things:
- Set a high enough gas price level (base fee, max fee, max priority fee),
- Send bundles to multiple builders, ideally to all top 5 builders to get your chances up to 90% success rate.
Whack-A-Mole currently only sends its bundle to Flashbots, but will quickly add support for multi-builder submission in the next version update.
To use bundle submission in Whack-A-Mole, we use the DexOrder class.
Using the send_bundle function in DexOrder, we can submit a bundled transaction to Flashbots:
async def send_bundle(self,
                      w3: Web3,
                      bundle: List[Dict[str, Any]],
                      retry: int,
                      block_number: int = None) -> list:

    flashbots: Flashbots = w3.flashbots

    left_retries = retry

    if not block_number:
        block_number = w3.eth.block_number

    receipts = []

    while left_retries > 0:
        print(f'Sending bundles at: #{block_number}')
        try:
            flashbots.simulate(bundle, block_number)
        except Exception as e:
            print('Simulation error', e)
            break

        replacement_uuid = str(uuid4())
        response: FlashbotsBundleResponse = flashbots.send_bundle(
            bundle,
            target_block_number=block_number + 1,
            opts={'replacementUuid': replacement_uuid},
        )

        while w3.eth.block_number < response.target_block_number:
            await asyncio.sleep(1)

        try:
            receipts = list(
                map(lambda tx: w3.eth.get_transaction_receipt(tx['hash']), response.bundle)
            )
            print(f'\nBundle was mined in block {receipts[0].blockNumber}\a')
            break
        except TransactionNotFound:
            print(f'Bundle not found in block {block_number + 1}')
            flashbots.cancel_bundles(replacement_uuid)
            left_retries -= 1
            block_number += 1

    return receipts
The current project state didn’t require sending multiple transactions, so the example provided in dex_order.py will send a single signed transaction as a bundle to Flashbots.
The smart contract for executing multi-swaps is through the WhackAMoleBotV1 contract.
That marks the end of this section. I’m not sure if anyone’s still reading this post, but for those interested in how long it takes to build a bot like this, it took me two whole weeks to finish my prototype — that is, this current version.
Additionally, prior to that, I spent a little over a month studying MEV. So, the overall time it takes for people to get started will be a minimum of two months, give or take. And that’s just for the template-building part. Making optimizations to reach a profitable state will be a whole new level.
9. Future optimizations
We are finally at the last section of today’s post. And in the last one, I’d like to briefly talk about how Whack-A-Mole is going to improve in further version updates.
Currently, only able to handle single chain DEX arbitrages, Whack-A-Mole is now going to venture into uncharted territory and look for more moles to whack from outside of the Ethereum ecosystem.
I will quickly add CEX support for the top traded exchanges such as Binance, Bybit, and OKX. There will also be a CEX aggregator based on multi-orderbook system that makes a single orderbook struture composed of multiple exchanges’ orderbook data.
With the multi-orderbook system we’ll be able to get top bids and asks for multiple CEXs and compare the spreads between CEX and DEX to take trades on multiple order venues simultaneously.
If all this sounds too foreign, stick around a bit longer and see how CEX-DEX arbitrage is done in the next post! 😃 It won’t be too difficult.
On top of this, I’ll optimize the components of Whack-A-Mole introduced in this post one at a time, and improve the competitiveness of our system. I’ll start by what I think are the most important:
Improve latency:
- Building an offline swap simulator (Uniswap V2, V3 variants)
Improve profitability + increase block addition probability:
- Better optimization of swap amount ins
- Using flashloans to improve capital efficiency
- Sending private transactions or bundles to multiple block proposers including Flashbots
- A more gas efficient WhackAMoleBot contract using assembly
- Analyzing competitors’ gas strategies